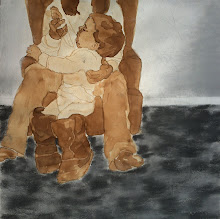
I put in the 1970's flower colors. I think they might be a bit too strong. When its dry tomorrow I'll sand it down a bit and that should work. Heres a detail image too.
Wednesday, March 31, 2010
Sunday, March 28, 2010
final stain applications
Thursday, March 25, 2010
Almost Done
Tuesday, March 23, 2010
baby face
The lowlights and midtones are in. Im going to put in the super darks tonight before I go home. Tomorrow after work its sanding in the highlights. I also have been working on a new one lately. Nothing worth photographing yet. In a couple days I'll have a photo posted of it.
Thursday, March 18, 2010
face time
Gotta sand down the face then draw features with pencil. Then use dremel and exacto to add line quality. Then stain with walnut. Then sand to bring in highlights. yada yada yada. Will this ever be done!!!
I guess Im in control of that.
Tuesday, March 16, 2010
thumbs up
Working on the hands now. I tried a new technique for shading and linework. I put in my lines with the dremel and an exacto knife. Then I'll sand out the walnut on the suface, leaving the stained grooves caused by the dremel and knife. Basically, like an etching plate without the printing process. After the sanding, I will try a coat of gunstock for a layer of warmth. Then lightly sand it down in the shaded areas and sand it down completely in the highlights. Then stain it all with puritan pine. If the highlights are not good enough, I will have to do a coat of homemade white. but I hope I don't have to go there because I want to treat the skin differently than I treated the sweaters. The sweaters are almost completely home-made stain and the material has a residue effect.
Sunday, March 14, 2010
Friday, March 12, 2010
gray tones
Thursday, March 11, 2010
Starting in on the details
Shading turned out ok for now. Not able to do the highlights yet because I want the shadows to be dry. I'll tackle it tomorrow morning on the large sweater and tomorrow evening on the baby sweater. With the highlights on the baby sweater, I should try to find a way to give them an extra shimmer. Maybe I could give them an extra layer of white stain. Then it will be time to get the armrest of the couch put in. I made a mistake on the collar. It encroaches way too far to the right. I'll have to sand it back when I put in the armrest. These are all nit-picky items, and it will be nice to have another painting started this weekend so I can keep growing in momentum.
Wednesday, March 10, 2010
Home-made stain worked out alright
I applied the home-made white stain for the baby's shirt and buffed out some of the shadowy spots. Next step will be to put in the lowlights and highlights tomorrow evening after work to get the baby shirt fabric folds more defined. If time allows I'll go to Fleet Farm to get boards for the next one. Can't wait to start the next one.
Monday, March 8, 2010
Saturday, March 6, 2010
This Painting is Kicking My Ass
Im at a crossroads with this one. Im not sure what I think of the gray area. It mostly sits on top of the wood surface and doesn't sink below like the stains everywhere else. I think I might sand away some highlights and see how that looks. Maybe after that I will use a white pickling stain. However, before anything, I should put in the shadows. I think thats what I will do.
Just put in the shadows. I'll have to wait until the morning to sand in the areas where I want to apply the white stain. Its wierd that I like the gray sweater in the pictures I take of the piece, but when standing in front of it Im not too sure. At least its looking a little better with a bit more shading.
Tried sanding in some highlights with the mouse sander but was not very successful. Im starting to hate the filmy gray. I might as well get rid of it. Its not that I think all areas of the painting need to have the same depth into the wood. Its that Im not excited about the filmy home-made stain. It sucks. Im not feeling it. Oh well, it was a nice experiment.
Subscribe to:
Comments (Atom)


